Reflex Premium Services
How do I create a Promissory Note (P-Note)?
Maker is primarily performing the data input for P-Note
Application.
-
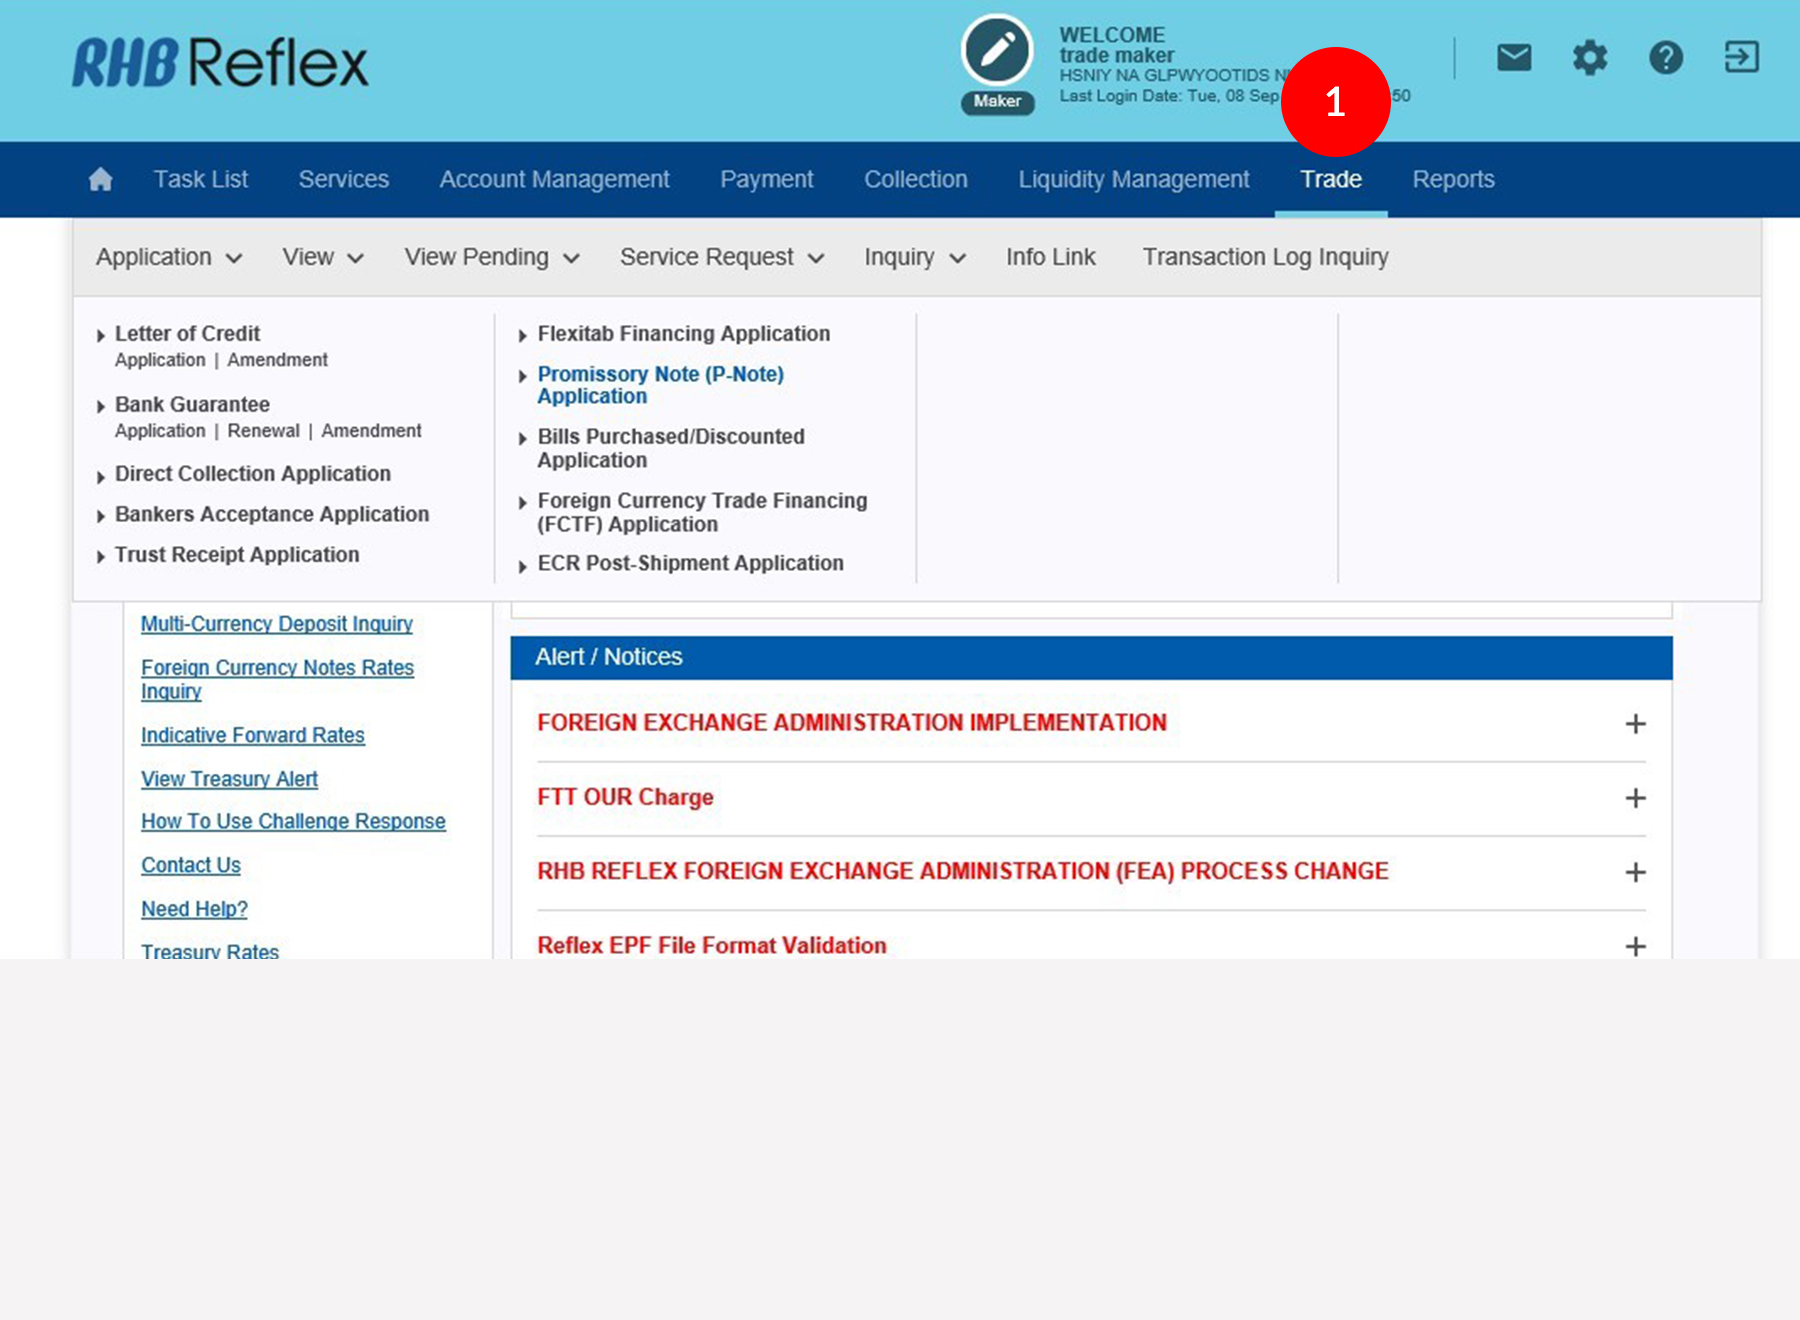
1.Login as Maker and click on the Trade Module.
-
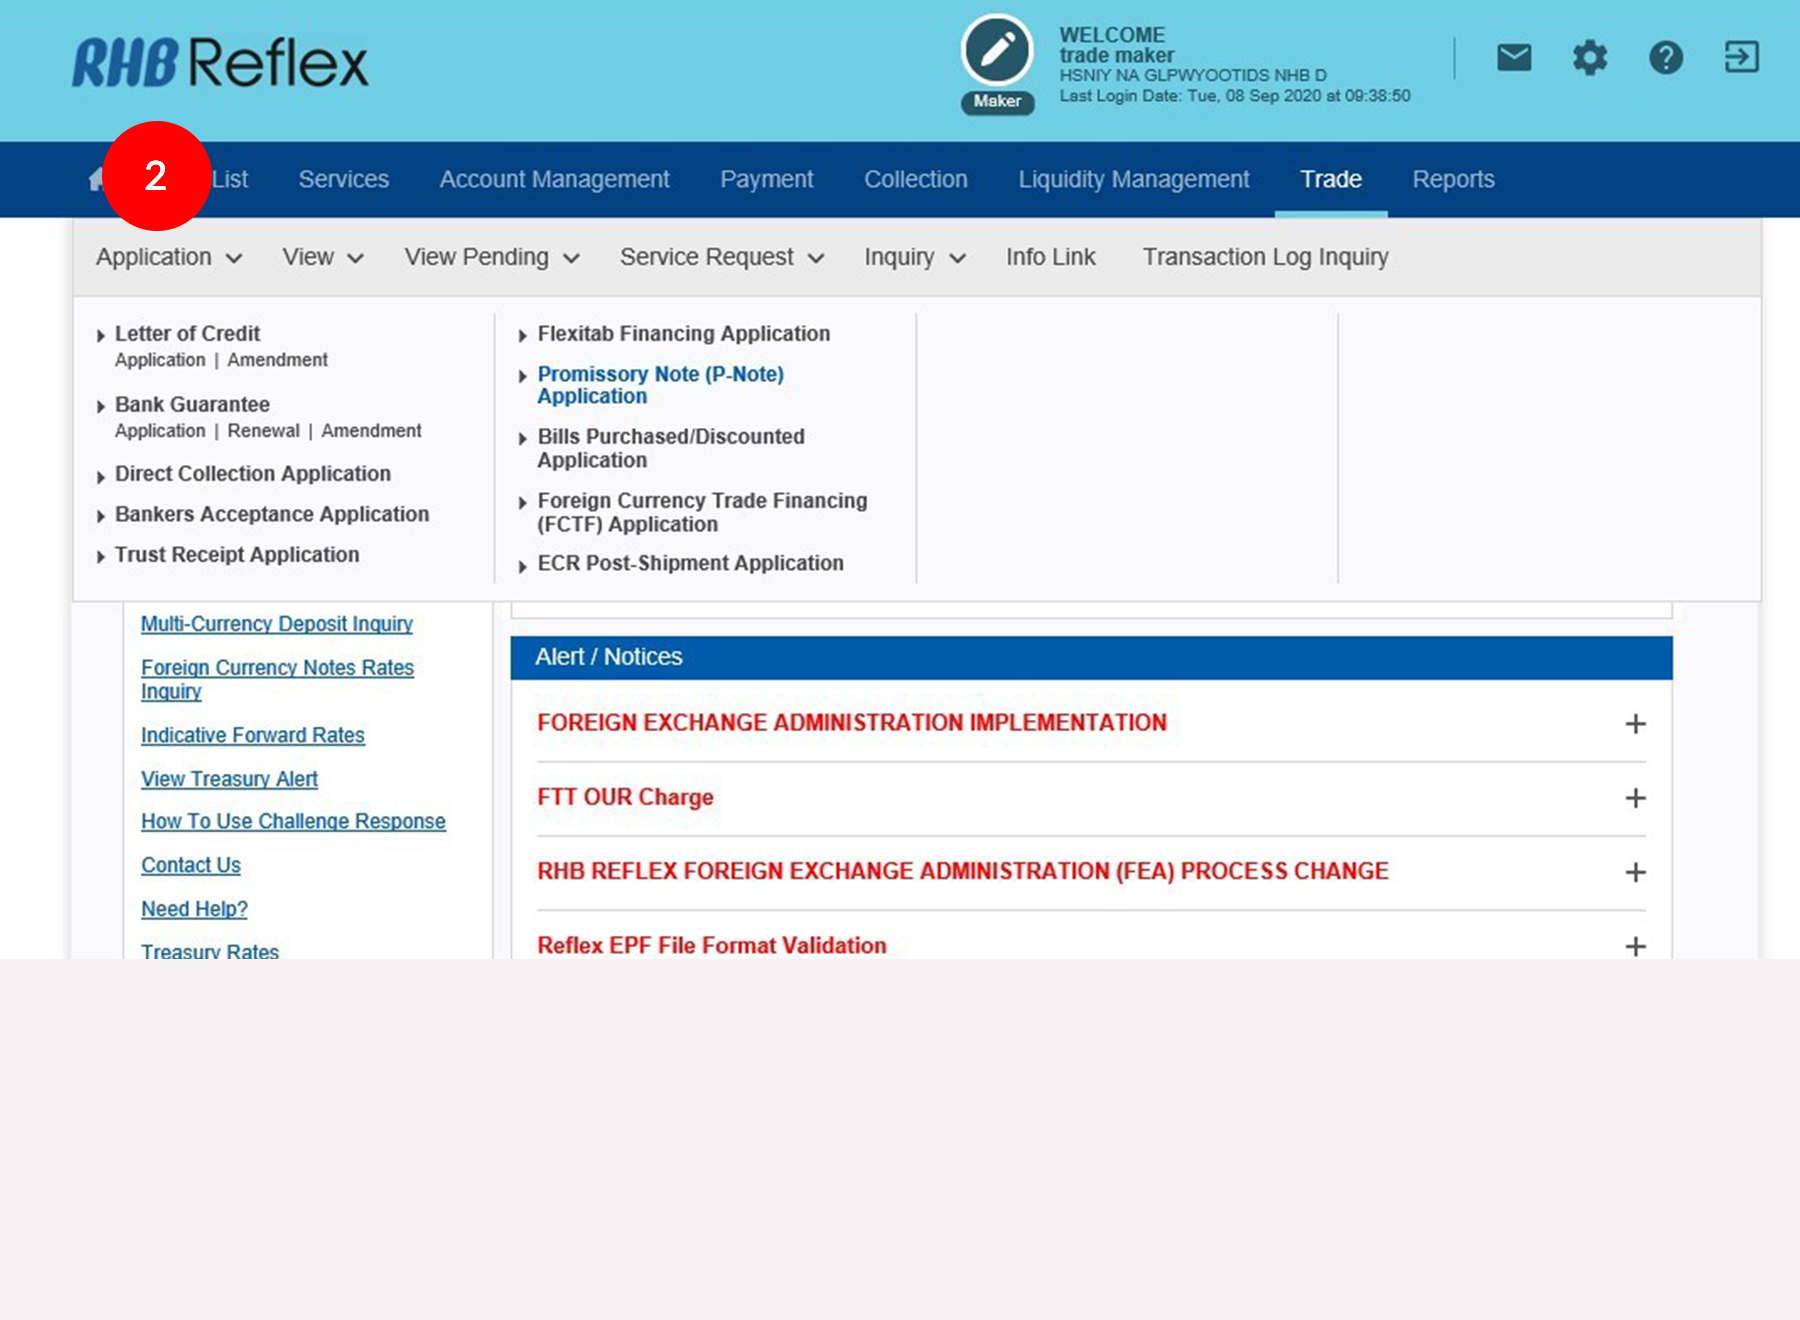
2.Click on the Application.
-
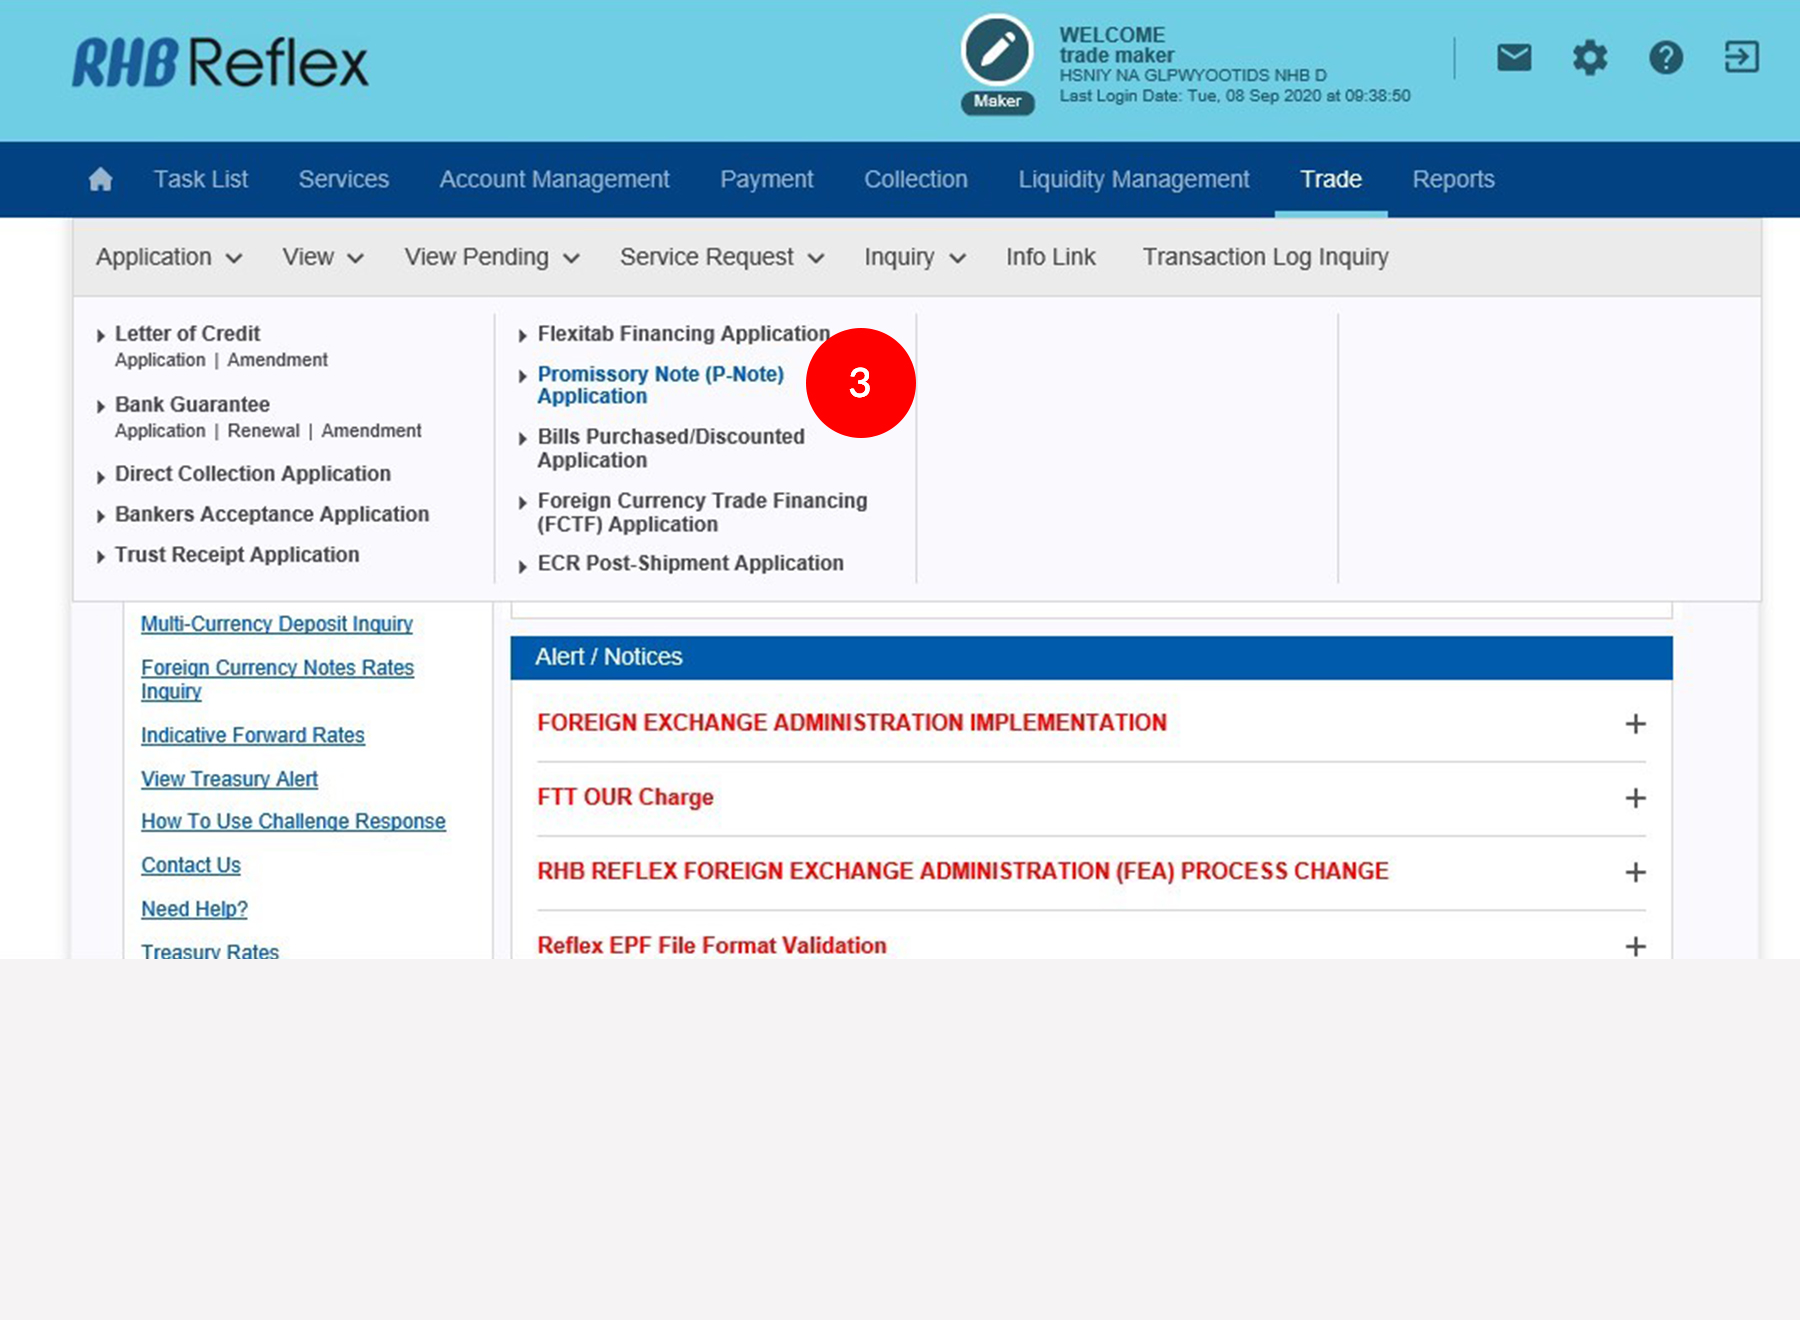
3.Then click on the Promissory Note (P-Note) Application, and the Trade Account Selection page appears.
-
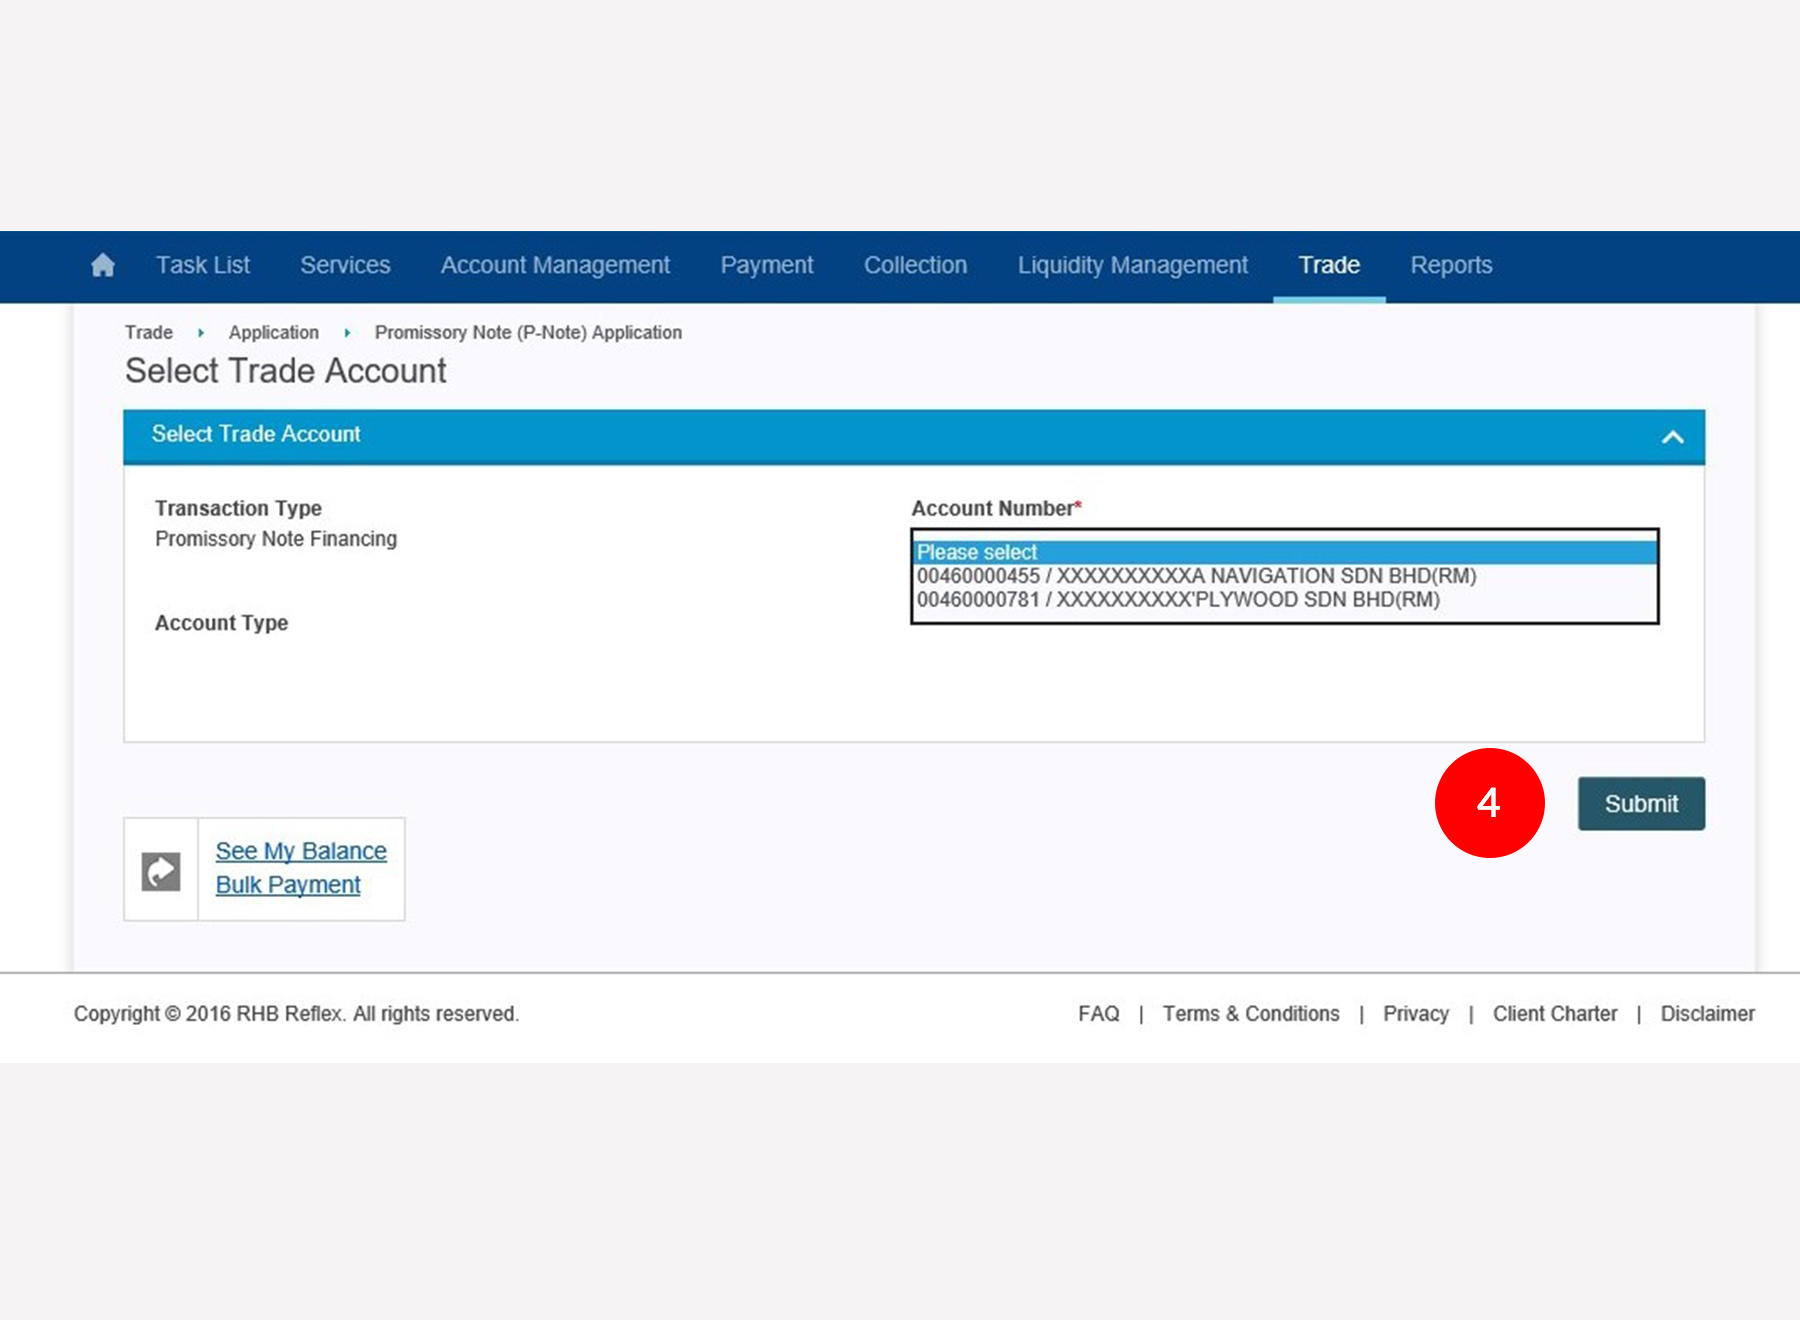
4.Select an account from the drop down list and click
 .
. -
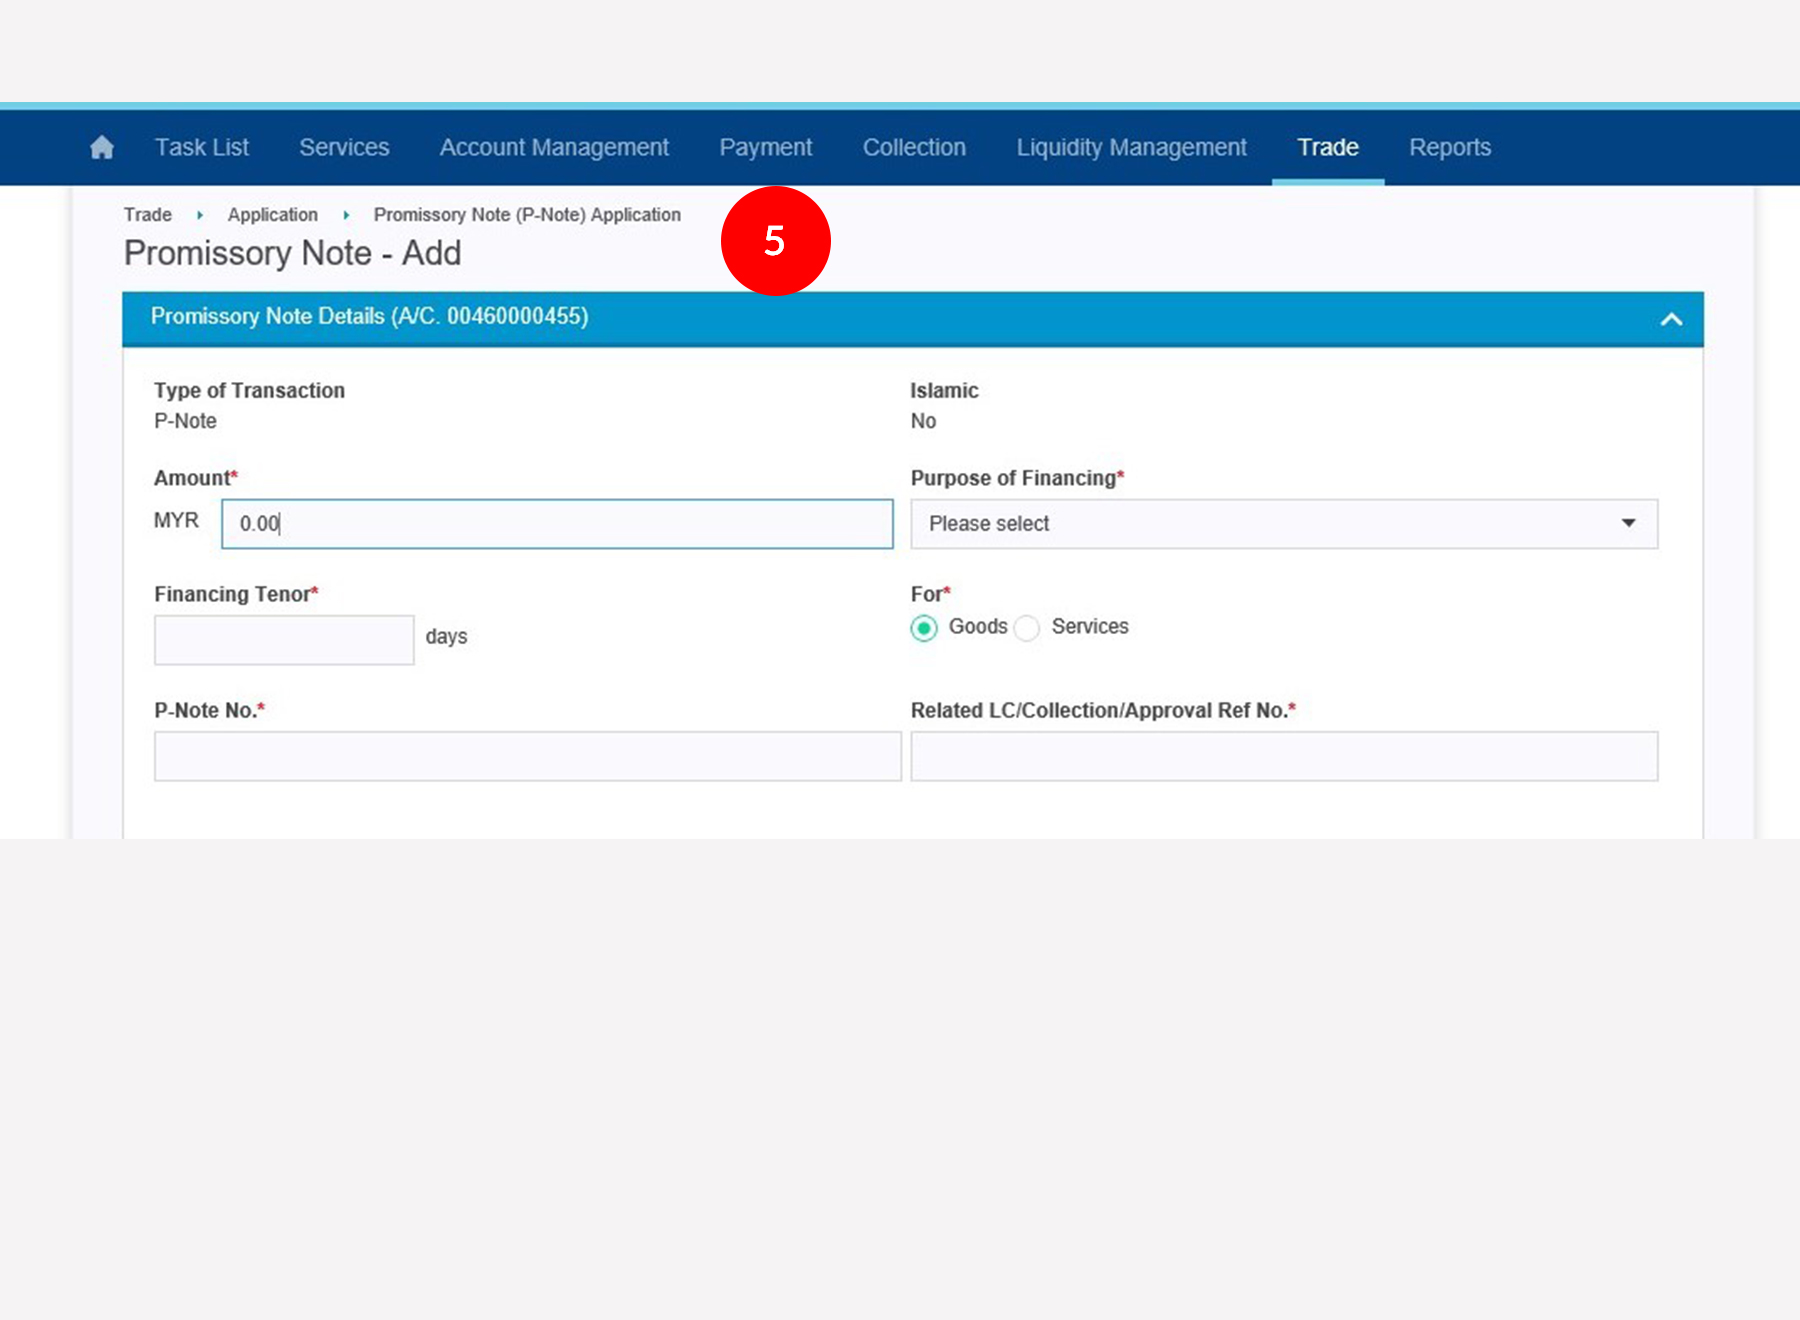
5.The P-Note details application screen will appear and the Maker needs to input all the necessary details.
• Amount – to key in the financing amount that is required. • Purpose of Financing – select the purpose of financing either Purchase from Resident, Purchase from Non-Resident, Sales to Resident or Sales to Non- Resident. • Financing Tenor – to key in the financing tenor that is required or key in the maximum financing tenor as granted under Letter Offer. • For – Select the P-Note financing on Goods or Services. • P-Note No. – Key in the P-Note draft no. • Related LC/Collection/Approval Ref No. - If the P-Note financing is for settling the IB/IBC bill, please fill in the IB/IBC reference no. If the P-Note financing is under open account, then customer needs to key in the Approval Ref No. provided by the Trade Operation Management Department. -
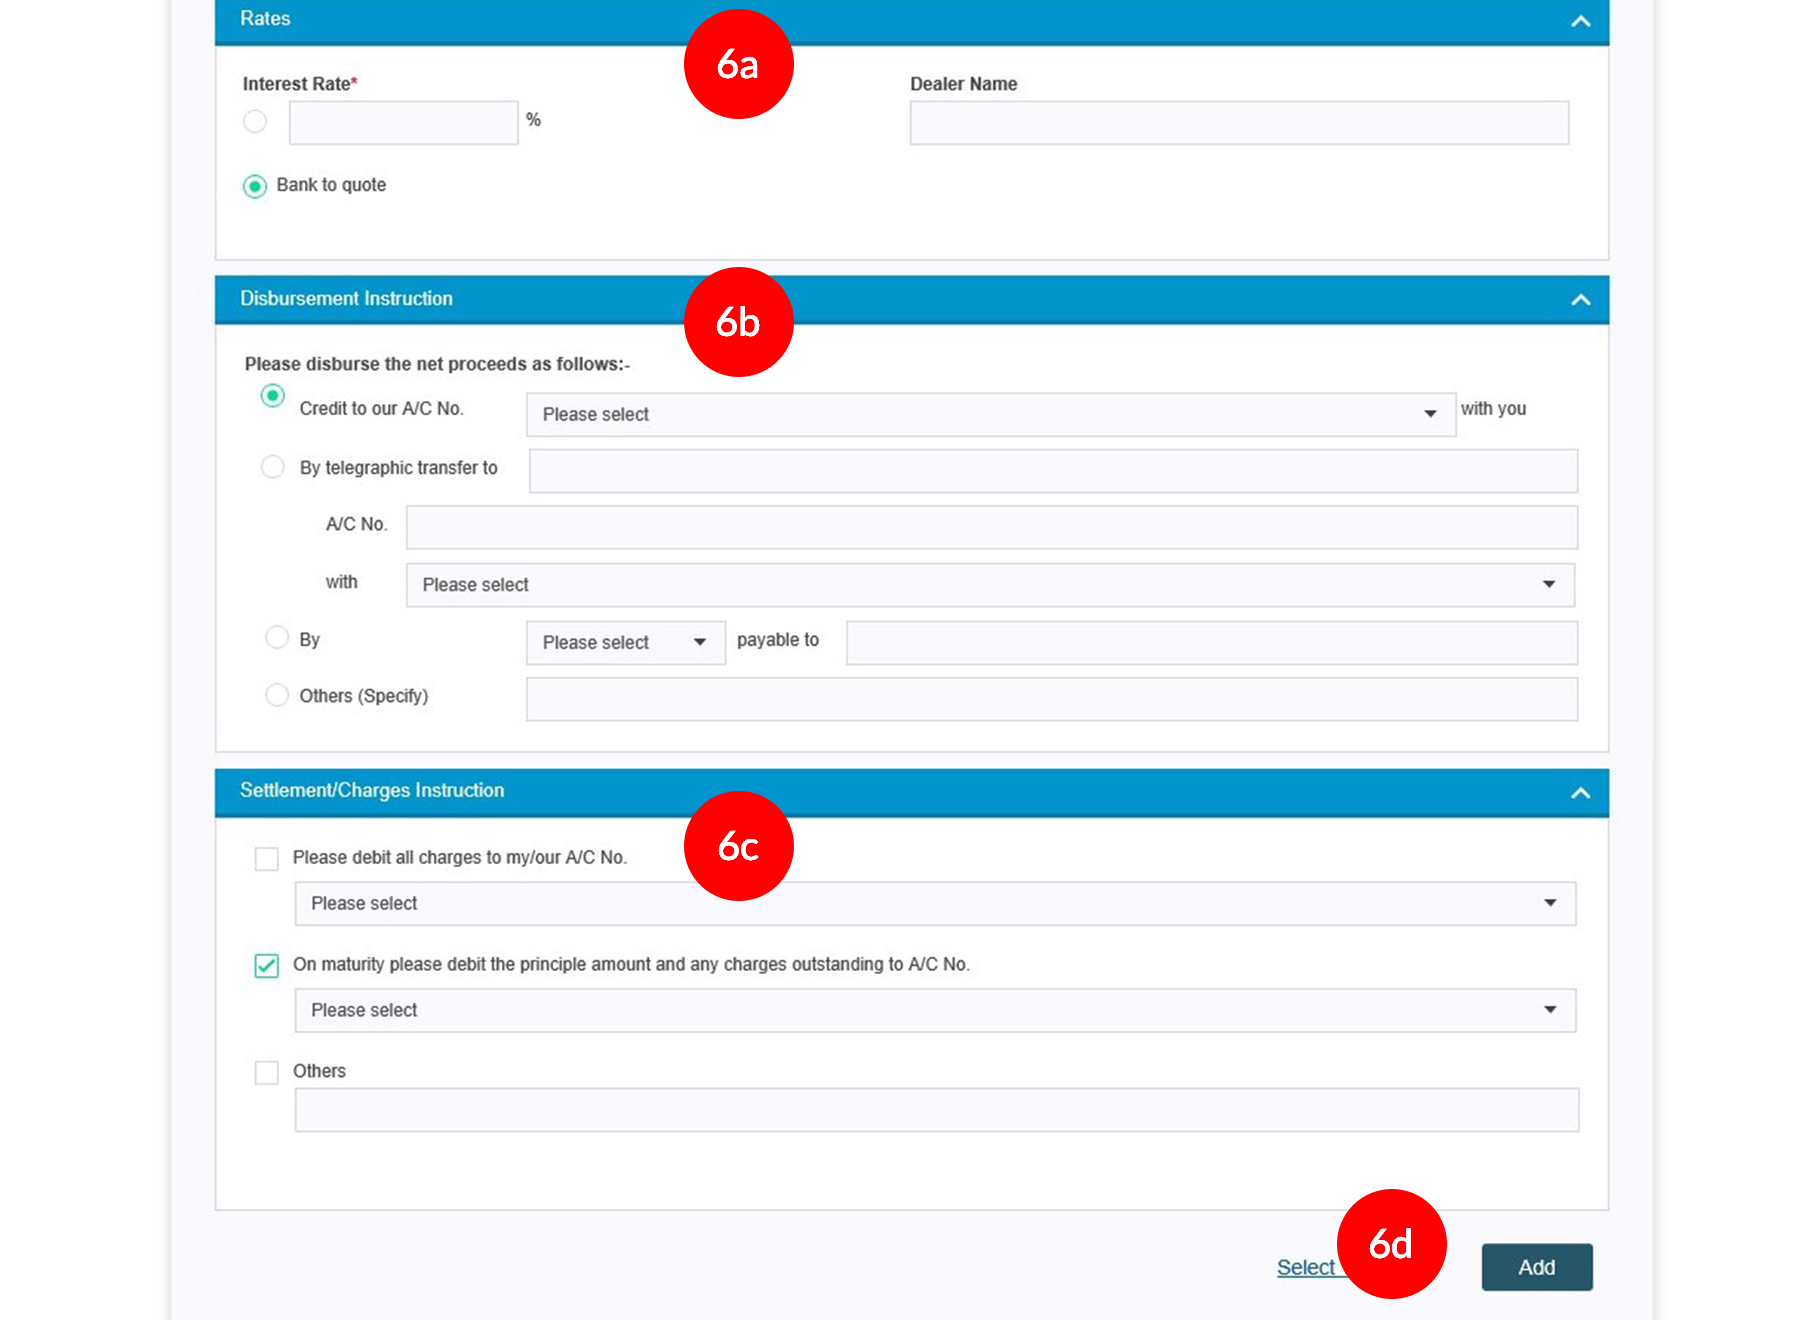
6.
a) For the Rates, please select Bank To Quote. b) For Disbursement Instruction, please select the relevant instruction and fill in accordingly. For multiple payments to suppliers, please select the option “Others” and specify “Please refer to instruction letter attached”. The instruction letter must be chopped, signed by Authorized Signatory and attached at the “Add Attachment” screen. c) Under Settlement/Charges Instruction, the Maker must select the account number to debit for charges and debiting upon maturity. d) Once all the details have been inputted, click on the  to
save data and it will route to the Attachment
screen.
 -
7.
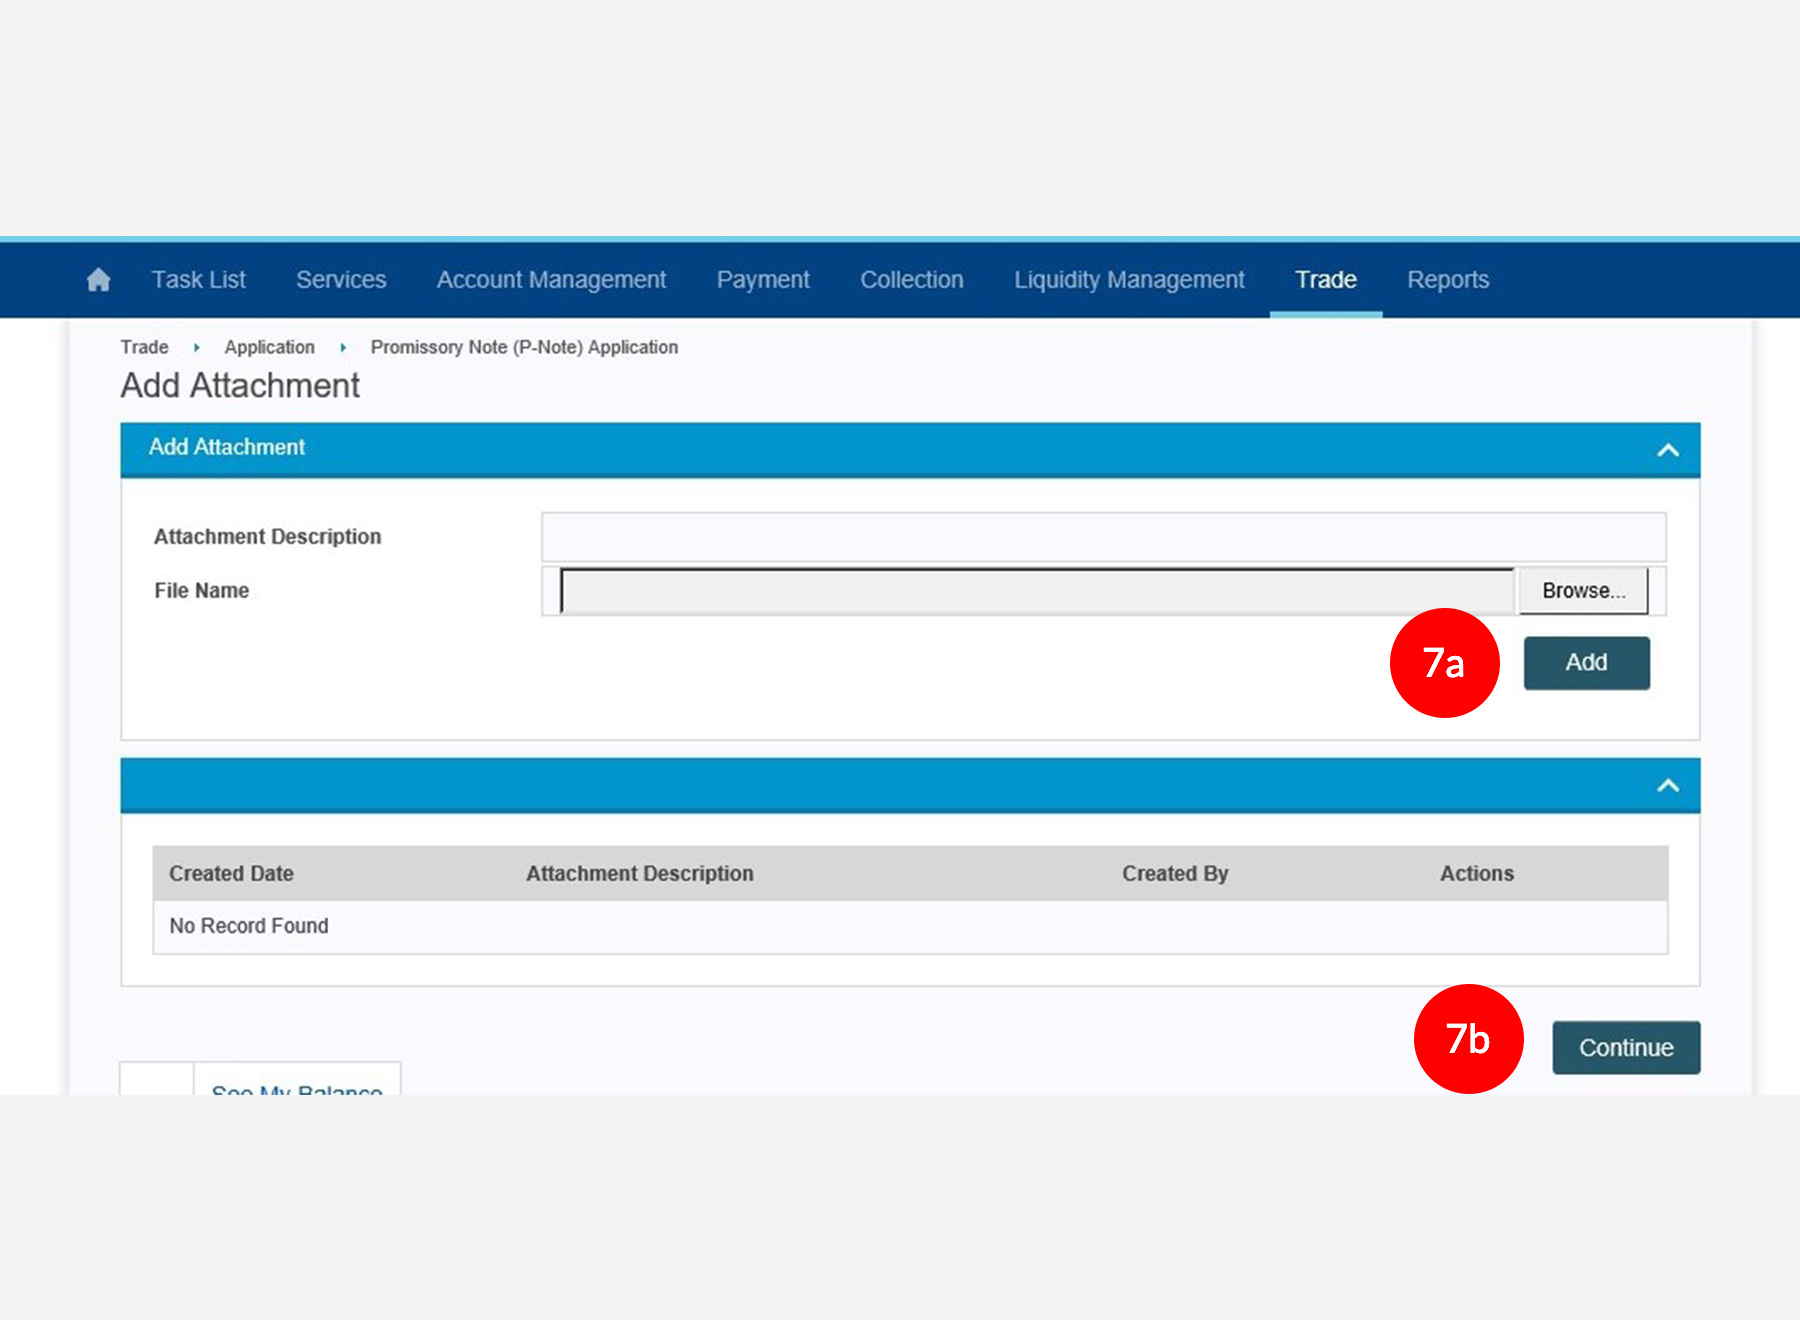
a) At Attachment Page, Maker can choose to upload document files to the application by inputting the Attachment Description for the file to be uploaded and clicking on Choose File to browse for required file. Click  to
upload the file.
to
upload the file.b) The uploaded file appears under the Uploaded Attachments with information such as created date, attachment description, creator and action available for the attachment. Click  to continue to the Preview Page.
 -
8.
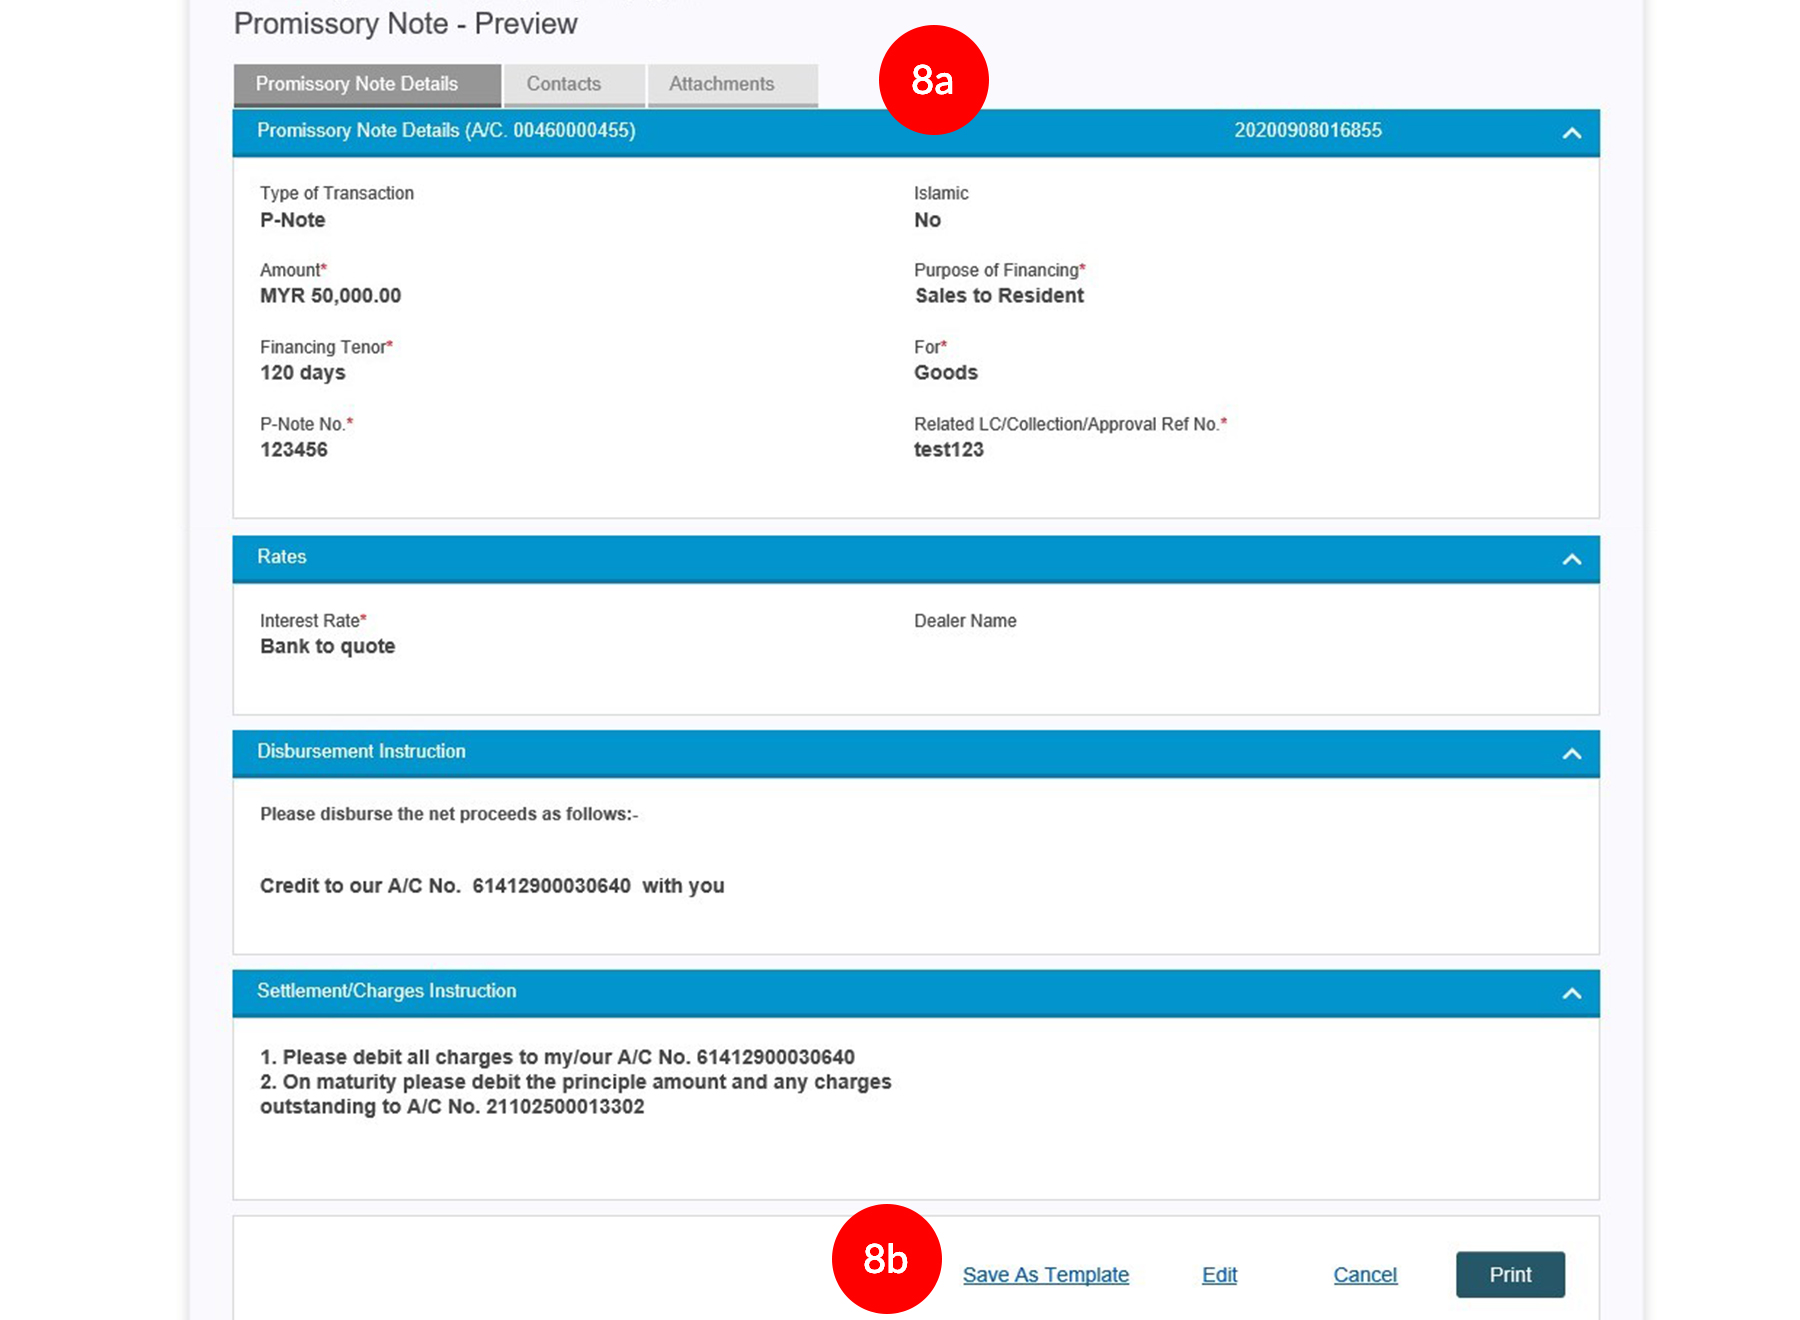
a) A Preview Page appears with all inputted P-Note Details shown in the respective fields with confirmation no. generated at the top right hand corner. b) Maker can click on the  to save the inputted P-Note details for future use.
-
9.Before Maker can submit for Authorizer to approve, system will show Challenge Code and require Token Passcode to be keyed in to be able to submit. To authenticate your transaction, please refer to steps below:
a) Press the  button and enter the PIN Number. The word “rHb” will
be displayed and then you press 2.
button and enter the PIN Number. The word “rHb” will
be displayed and then you press 2.b) Enter the Challenge Code into the Token. c) An 8-digit number will be generated by the Token and key in this number at the Token field. -
10.Click on
 to proceed.
It will route to Confirmation/Acknowledgement page.
1 of
10
-
1.Login as Maker and click on the Trade Module.
-
2.Click on the Application.
-
3.Then click on the Promissory Note (P-Note) Application, and the Trade Account Selection page appears.
-
4.Select an account from the drop down list and click
 .
. -
5.The P-Note details application screen will appear and the Maker needs to input all the necessary details.
• Amount – to key in the financing amount that is required. • Purpose of Financing – select the purpose of financing either Purchase from Resident, Purchase from Non-Resident, Sales to Resident or Sales to Non- Resident. • Financing Tenor – to key in the financing tenor that is required or key in the maximum financing tenor as granted under Letter Offer. • For – Select the P-Note financing on Goods or Services. • P-Note No. – Key in the P-Note draft no. • Related LC/Collection/Approval Ref No. - If the P-Note financing is for settling the IB/IBC bill, please fill in the IB/IBC reference no. If the P-Note financing is under open account, then customer needs to key in the Approval Ref No. provided by the Trade Operation Management Department. -
6.
a) For the Rates, please select Bank To Quote. b) For Disbursement Instruction, please select the relevant instruction and fill in accordingly. For multiple payments to suppliers, please select the option “Others” and specify “Please refer to instruction letter attached”. The instruction letter must be chopped, signed by Authorized Signatory and attached at the “Add Attachment” screen. c) Under Settlement/Charges Instruction, the Maker must select the account number to debit for charges and debiting upon maturity. d) Once all the details have been inputted, click on the  to
save data and it will route to the Attachment
screen.
 -
7.
a) At Attachment Page, Maker can choose to upload document files to the application by inputting the Attachment Description for the file to be uploaded and clicking on Choose File to browse for required file. Click  to
upload the file.
to
upload the file.b) The uploaded file appears under the Uploaded Attachments with information such as created date, attachment description, creator and action available for the attachment. Click  to continue to the Preview Page.
 -
8.
a) A Preview Page appears with all inputted P-Note Details shown in the respective fields with confirmation no. generated at the top right hand corner. b) Maker can click on the  to save the inputted P-Note details for future use.
-
9.Before Maker can submit for Authorizer to approve, system will show Challenge Code and require Token Passcode to be keyed in to be able to submit. To authenticate your transaction, please refer to steps below:
a) Press the  button and enter the PIN Number. The word “rHb” will
be displayed and then you press 2.
button and enter the PIN Number. The word “rHb” will
be displayed and then you press 2.b) Enter the Challenge Code into the Token. c) An 8-digit number will be generated by the Token and key in this number at the Token field. -
10.Click on
 to proceed.
It will route to Confirmation/Acknowledgement page.

-
1.Login as Maker and click on the Trade Module.
-
2.Click on the Application.
-
3.Then click on the Promissory Note (P-Note) Application, and the Trade Account Selection page appears.
-
4.Select an account from the drop down list and click
 .
.
-
5.The P-Note details application screen will appear and the Maker needs to input all the necessary details.
• Amount – to key in the financing amount that is required. • Purpose of Financing – select the purpose of financing either Purchase from Resident, Purchase from Non-Resident, Sales to Resident or Sales to Non- Resident. • Financing Tenor – to key in the financing tenor that is required or key in the maximum financing tenor as granted under Letter Offer. • For – Select the P-Note financing on Goods or Services. • P-Note No. – Key in the P-Note draft no. • Related LC/Collection/Approval Ref No. - If the P-Note financing is for settling the IB/IBC bill, please fill in the IB/IBC reference no. If the P-Note financing is under open account, then customer needs to key in the Approval Ref No. provided by the Trade Operation Management Department.
-
6.
a) For the Rates, please select Bank To Quote. b) For Disbursement Instruction, please select the relevant instruction and fill in accordingly. For multiple payments to suppliers, please select the option “Others” and specify “Please refer to instruction letter attached”. The instruction letter must be chopped, signed by Authorized Signatory and attached at the “Add Attachment” screen. c) Under Settlement/Charges Instruction, the Maker must select the account number to debit for charges and debiting upon maturity. d) Once all the details have been inputted, click on the  to
save data and it will route to the Attachment
screen.
-
7.
a) At Attachment Page, Maker can choose to upload document files to the application by inputting the Attachment Description for the file to be uploaded and clicking on Choose File to browse for required file. Click  to
upload the file.
to
upload the file.b) The uploaded file appears under the Uploaded Attachments with information such as created date, attachment description, creator and action available for the attachment. Click  to continue to the Preview Page.
-
8.
a) A Preview Page appears with all inputted P-Note Details shown in the respective fields with confirmation no. generated at the top right hand corner. b) Maker can click on the  to save the inputted P-Note details for future use.
-
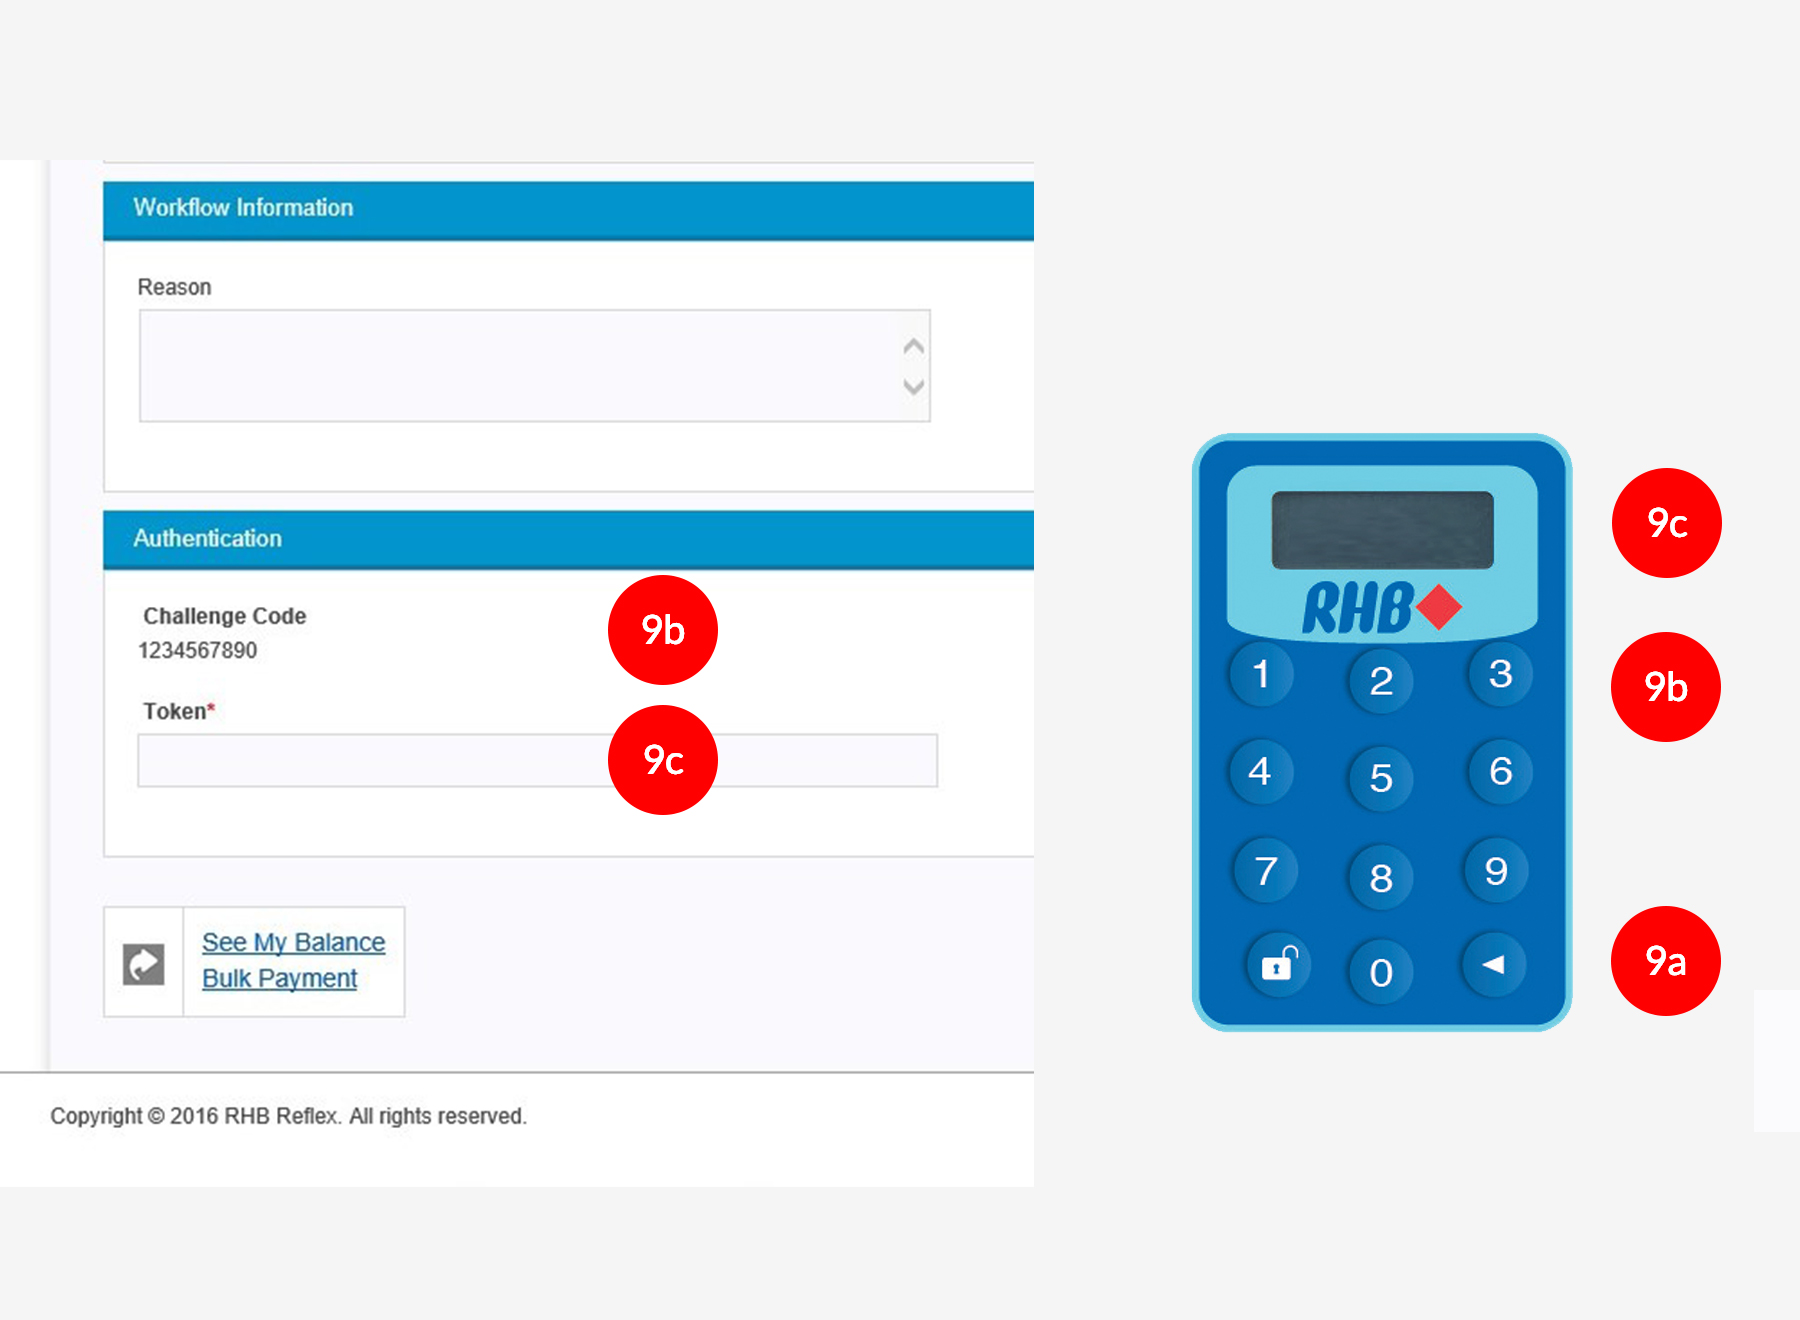
9.Before Maker can submit for Authorizer to approve, system will show Challenge Code and require Token Passcode to be keyed in to be able to submit. To authenticate your transaction, please refer to steps below:
a) Press the  button and enter the PIN Number. The word “rHb” will
be displayed and then you press 2.
button and enter the PIN Number. The word “rHb” will
be displayed and then you press 2.b) Enter the Challenge Code into the Token. c) An 8-digit number will be generated by the Token and key in this number at the Token field.
-
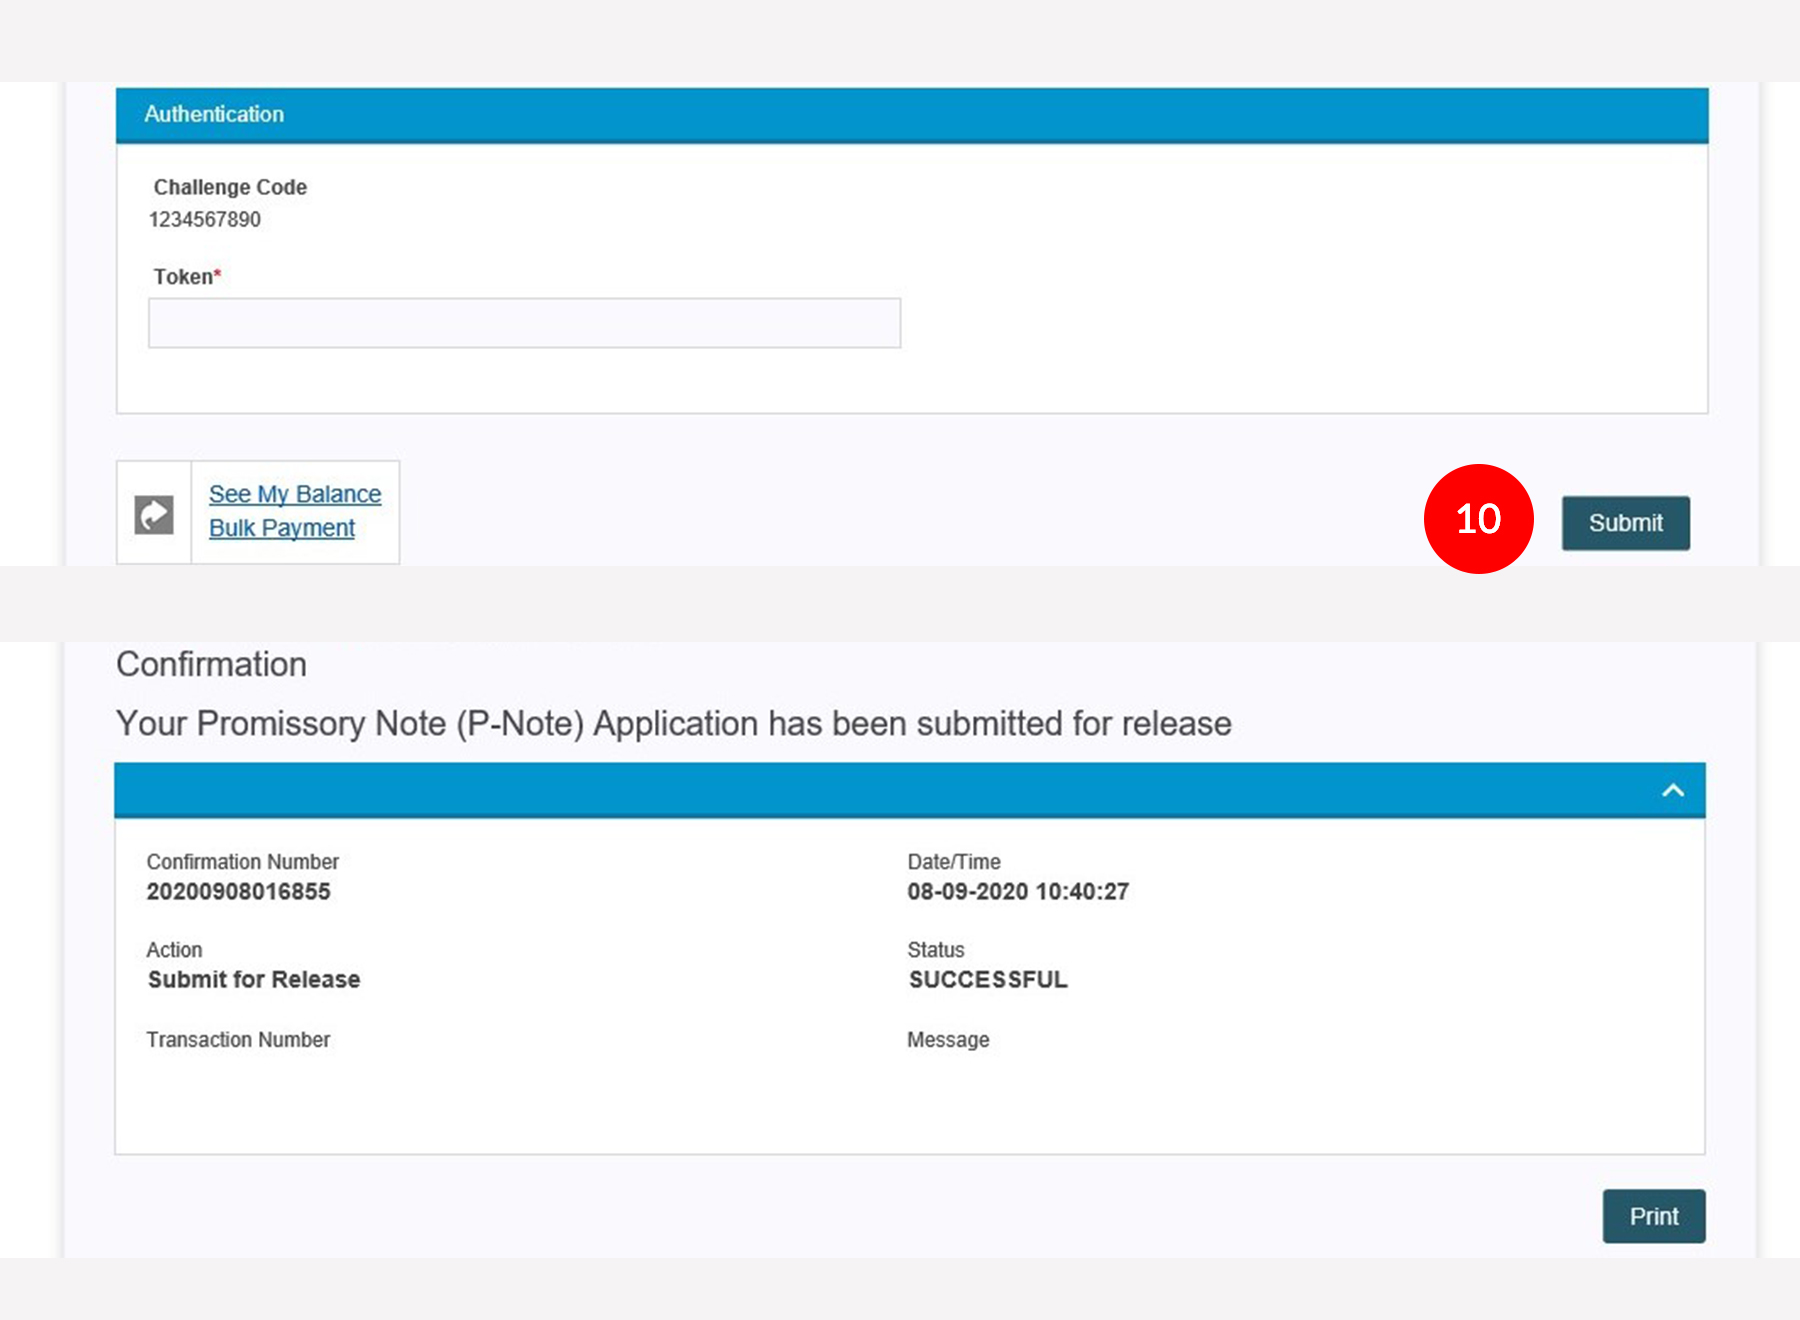
10.Click on
 to proceed.
It will route to Confirmation/Acknowledgement page.


